Here, Dr Bill Eccles, Bolt Science looks at the basic principles of screw threads, including their tolerances and allowances which are applied, as well as the problems associated with this.
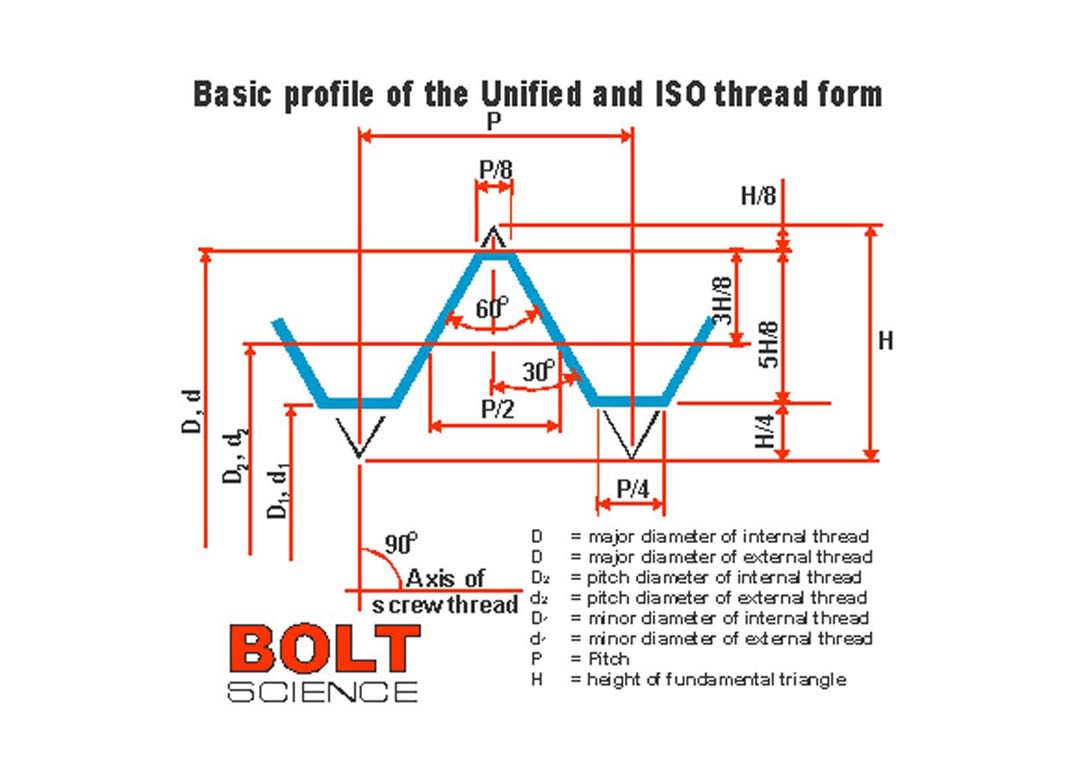
The basic profile is the theoretical profile of the thread. An essential principle is that the actual profiles of both the nut and bolt threads must never cross or transgress the theoretical profile. So, bolt threads will always be equal to, or smaller than, the dimensions of the basic profile. Nut threads will always be equal to, or greater than, the basic profile. To ensure this in practice, tolerances and allowances are applied to the basic profile.
Tolerancing of screw threads
Tolerancing of screw threads is complicated by the complex geometric nature of the screw thread form. Clearances must be applied to the basic profile of the threads in order for a bolt thread to be screwed into a nut thread. For the thread to be made practically there must be tolerances applied to the main thread elements.
Usually nut threads have a tolerance applied to the basic profile so that it is theoretically possible for the nut thread profile to be equal to the theoretical profile. Bolt threads usually have a gap between the basic and actual thread profiles. This gap is called the allowance with inch-based threads and the fundamental deviation with metric threads. The tolerance is subsequently applied to the thread. Since for coated threads the tolerances apply to threads before coating (unless otherwise stated), the gap is taken up by the coati ng thickness. After coating, the actual thread profile must not transgress the basic profile of the thread.
A full designation for a metric thread includes information not only on the thread diameter and pitch but also a designation for the thread tolerance class. For example a thread designated as M12 x 1 - 5g6g indicates that the thread has a nominal diameter of 12mm and a pitch of 1mm. The 5g indicates the tolerance class for the pitch diameter and 6g is the tolerance class for the major diameter.
A fit between threaded parts is indicated by the nut thread tolerance designation followed by the bolt thread tolerance designation separated by a slash. For example: M12 x 1 - 6H/5g6g indicates a tolerance class of 6H for the nut (female) thread and a 5g tolerance class for the pitch diameter with a 6g tolerance class for the major diameter. A tolerance class is made up of two parts, a tolerance grade and a tolerance position.
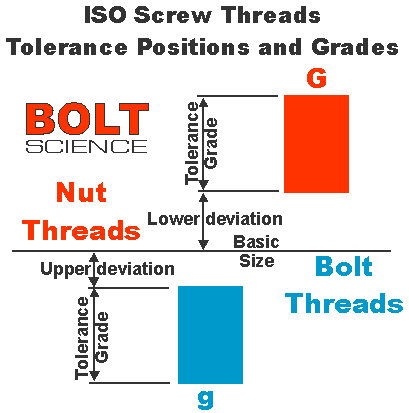
A number of tolerance grades have been established for the pitch and crest diameters (the crest diameter is the minor diameter in the case of a nut thread and the major diameter in the case of a bolt thread. Tolerance grades are represented by numbers, the lower the number the smaller the tolerance. Grade 6 is used for a medium tolerance quality and a normal length of thread engagement. Grades lower than 6 are intended for fine tolerance quality and/or short lengths of thread engagement. Grades higher than 6 are intended for coarse tolerance quality and/or long lengths of thread engagement.
There are:
- 5 tolerance grades (grades 4 to 8) available for the minor diameter of the nut thread
- 3 tolerance grades (grades 4,6 and 8) for the major diameter of the bolt thread
- 5 tolerance grades (grades 4 to 8) for the pitch diameter tolerance of the nut thread
- 7 tolerance grades (grades 3 to 9) for the pitch diameter tolerance of the bolt thread
For nut threads there are two tolerance positions, H with a zero fundamental deviation (distance of the tolerance position from the basic size) and G with a positive fundamental deviation. For bolt threads there are four tolerance positions, h has a zero fundamental deviation and e, f, and g negative fundamental deviations. (A positive fundamental deviation indicates that the size for the thread element will be larger than the basic size. A negative fundamental deviation indicates that the size for the thread element will be smaller than the basic size.
One practical problem that is often encountered is what thread tolerance to apply to a tapped hole. The standard tolerance classes of 6g for the bolt thread and 6H for the nut thread are typically included on a drawing as default. A problem that sometimes occurs is that on long thread engagements (that are frequently used for tapped holes in soft materials) there can be an interference between the nut thread and the screw thread as the screw is rotated into the tapped hole.
There can be a slight mismatch in the thread pitch between the internal thread and the external thread necessitating a wrench to rotate the fastener to the bottom of the thread ie. it can't be freely rotated. The standard tolerance classes apply strictly only when a relatively short length of engagement is used (such as with a nut which is typically 0.8d where d is the thread size).
The pitch diameter tolerance must be able to accomodate pitch and flank angle errors which can sometimes only be done by changing the tolerance position say from a H to a G for the internal thread (since standard screws - 6g - are wished to be used). Failure to change the tolerance position can result in thread seizure and damage especially if high speed tools are being used for the tightening process.
www.boltscience.com

Becca is the latest member to join our team and is eager to get stuck into the world of fasteners. She brings an enthusiastic and fresh outlook on what we do editorially and will be leading our social media activity – including sourcing material, editing articles and posting online.


